Under Ubuntu you can install it wit apt-get install siege
siege -d10 -c10 -i -f url.txt
put some url on to the txt file and start it
https://serverfault.com/questions/181638/alternatives-to-apache-benchmark
Under Ubuntu you can install it wit apt-get install siege
siege -d10 -c10 -i -f url.txt
put some url on to the txt file and start it
https://serverfault.com/questions/181638/alternatives-to-apache-benchmark
Let analsysis ALB Logfiles with Athena.
First THX to Rob Witoff https://medium.com/@robwitoff/athena-alb-log-analysis-b874d0958909 for your excellent example.
Next THX is to AWS Support that helped me to figure out some issues.
I tested below CREATE TABLE query with your sample data, and using below schema helped to read your alb logs data successfully:
CREATE EXTERNAL TABLE IF NOT EXISTS logs.web_alb
( type string,
time string,
elb string,
client_ip string,
client_port int,
target_ip string,
target_port int,
request_processing_time double,
target_processing_time double,
response_processing_time double,
elb_status_code string,
target_status_code string,
received_bytes bigint,
sent_bytes bigint,
request_verb string,
request_url string,
request_proto string,
user_agent string,
ssl_cipher string,
ssl_protocol string,
target_group_arn string,
trace_id string) ROW FORMAT SERDE 'org.apache.hadoop.hive.serde2.RegexSerDe'
WITH SERDEPROPERTIES (
'serialization.format' = '1','input.regex' = '([^ ]*) ([^ ]*) ([^ ]*) ([^ ]*):([0-9]*) ([^ ]*)[:\-]([0-9]*) ([-.0-9]*) ([-.0-9]*) ([-.0-9]*) (|[-0-9]*) (-|[-0-9]*) ([-0-9]*) ([-0-9]*) \"([^ ]*) ([^ ]*) (- |[^ ]*)\" (\"[^\"]*\") ([A-Z0-9-]+) ([A-Za-z0-9.-]*) ([^ ]*) (.*)' )
LOCATION 's3://<your_bucket>/'
Please note that in your sample data, there was no value for year, month and day as provided in the PARTITIONED BY clause in your create table query: PARTITIONED BY(year string, month string, day string) Hence I had to remove the PARTITIONED BY clause from your query. Can you try creating table using above schema and see if that helps in reading alb logs.

Enable access logs, choose a name of your bucket and say create this location for me. After this Athena have access to the log files also.
You can generate some data with benchmark tools of the website or you wait some minutes to have some data to analysis.
Then we go to Athena
now it will be a little bit tricky
we must create a db from hand, say add table
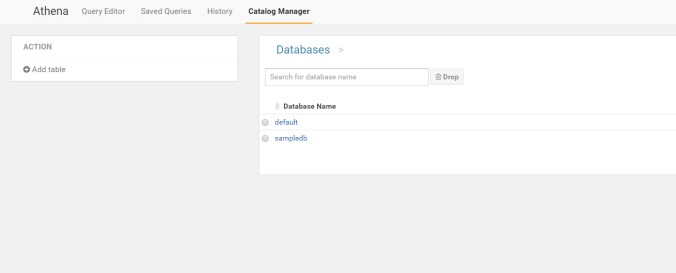
fill it out, database is logs
Table name is web_alb
put your s3 url into it
s3://com.mywebsite.httplog2/AWSLogs/595264310722/elasticloadbalancing/eu-central-1/2017/05/
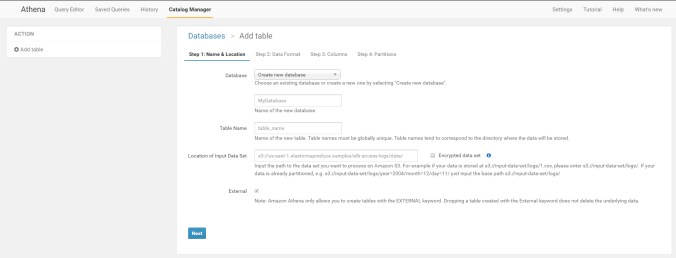
Say next and choose Apache Web Logs

add one table with name test, we will delete it later

Do nothing here and click, create table
Now we have created a Database with Name logs and a table with Name web_alb

now we just drop the table web_alb
DROP TABLE IF EXISTS web_alb PURGE;

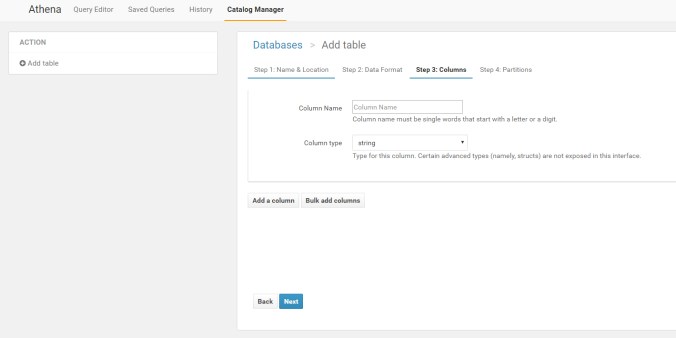
so then we fill in the correct table with all columns that we need
CREATE EXTERNAL TABLE IF NOT EXISTS logs.web_alb (
 type string,
 time string,
 elb string,
 client_ip string,
 client_port int,
 target_ip string,
 target_port int,
 request_processing_time double,
 target_processing_time double,
 response_processing_time double,
 elb_status_code string,
 target_status_code string,
 received_bytes bigint,
 sent_bytes bigint,
 request_verb string,
 request_url string,
 request_proto string,
 user_agent string,
 ssl_cipher string,
 ssl_protocol string,
 target_group_arn string,
 trace_id string)
ROW FORMAT SERDE 'org.apache.hadoop.hive.serde2.RegexSerDe'
WITH SERDEPROPERTIES (
 'serialization.format' = '1','input.regex' = '([^ ]*) ([^ ]*) ([^ ]*) ([^ ]*):([0-9]*) ([^ ]*)[:\-]([0-9]*) ([-.0-9]*) ([-.0-9]*) ([-.0-9]*) (|[-0-9]*) (-|[-0-9]*) ([-0-9]*) ([-0-9]*) \"([^ ]*) ([^ ]*) (- |[^ ]*)\" (\"[^\"]*\") ([A-Z0-9-]+) ([A-Za-z0-9.-]*) ([^ ]*) (.*)' )
LOCATION 's3://com.mysite.httplog2/AWSLogs/595264310722/elasticloadbalancing/eu-central-1/2017/05/'

we will fire up our first select
SELECT * FROM logs.web_alb LIMIT 100;
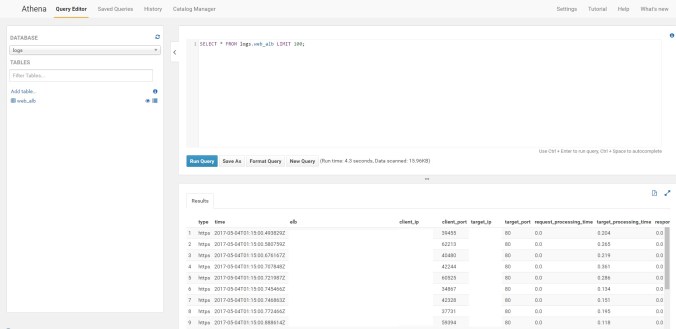
That´s was all
Example for most visitor sorted by most visit with user agent
SELECT user_agent, client_ip, COUNT(*) as count
FROM logs.web_alb
GROUP BY user_agent, client_ip
ORDER BY COUNT(*) DESC
Put following in your default.vcl file, all files that deliver with png,jpg,css add http cache control header max-age
sub vcl_backend_response {
# Happens after we have read the response headers from the backend.
#
# Here you clean the response headers, removing silly Set-Cookie headers
# and other mistakes your backend does.
if (bereq.url ~ “\.(png|gif|jpg|swf|css|js)$”) {
unset beresp.http.set-cookie;
set beresp.http.cache-control = “max-age = 2592000”;}
}
Default is 1024 and this is to low
https://raymii.org/s/tutorials/Strong_SSL_Security_On_nginx.html
cd /etc/ssl/certs
openssl dhparam -out dhparam.pem 4096
added to your nginx.conf
ssl_dhparam /etc/ssl/certs/dhparam.pem;
You can use Haproxy for a frontend ssl
with redirect from port 80 to 443
here is a sample haproxy.cfg
global
log 127.0.0.1 local0
log 127.0.0.1 local1 notice

user haproxy
group haproxy
daemon
stats socket /etc/haproxy/haproxysock level admin

maxconn 16384
tune.ssl.default-dh-param 4096
defaults
log global
balance roundrobin
mode http

retries 3
option httplog
option dontlognull

maxconn 10240
timeout connect 5s
timeout client 15s
timeout server 60s

backend my_frontend_pool
option forwardfor

server mylocalserver1.example.com 10.10.18.30:8080 weight 1 maxconn 512 check
server mylocalserver2.example.com 10.10.18.40:8080 weight 1 maxconn 512 check
server mylocalserver3.example.com 10.10.18.50:8080 weight 1 maxconn 512 check


frontend mylocalfrontend.example.com
bind 10.241.18.20:443 ssl crt /etc/ssl/myserver/wild.pem ciphers ECDHE+aRSA+AES256+GCM+SHA384:ECDHE+aRSA+AES128+GCM+SHA256:ECDHE+aRSA+AES256+SHA384:ECDHE+aRSA+AES128+SHA256:ECDHE+aRSA+RC4+SHA:ECDHE+aRSA+AES256+SHA:ECDHE+aRSA+AES128+SHA:AES256+GCM+SHA384:AES128+GCM+SHA256:AES128+SHA256:AES256+SHA256:DHE+aRSA+AES128+SHA:RC4+SHA:HIGH:!aNULL:!eNULL:!LOW:!3DES:!MD5:!EXP:!PSK:!SRP:!DSS no-sslv3

acl clear dst_port 80
acl secure dst_port 443

reqadd X-Forwarded-Proto:\ https if secure
reqadd FRONT_END_HTTPS:\ on if secure

default_backend my_frontend_pool

listen my_statistics :60099
stats enable
stats uri /
stats refresh 15s
This is for Version 4 i think it´s also work on Varnish 5
# Marker to tell the VCL compiler that this VCL has been adapted to the
# new 4.0 format.
vcl 4.0;

# Default backend definition. Set this to point to your content server.
backend default {
.host = "127.0.0.1";
.port = "8080";
}

acl purge {
"localhost";
"10.0.0.0"/8;
}

sub vcl_recv {
# Happens before we check if we have this in cache already.
#
# Typically you clean up the request here, removing cookies you don't need,
# rewriting the request, etc.
if (req.restarts == 0) {
if (req.http.X-Forwarded-For) {
set req.http.X-Forwarded-For = req.http.X-Forwarded-For + ", " + client.ip;
} else {
set req.http.X-Forwarded-For = client.ip;
}
}

if (req.method == "PURGE") {
if (!client.ip ~ purge) {
return(synth(405,"Request method not allowed."));
}
return (purge);
}

##pass a url not in cache
if (req.url ~ "^/admin/") {
return(pass);
}

if (req.method != "GET" &&
req.method != "HEAD" &&
req.method != "PUT" &&
req.method != "POST" &&
req.method != "TRACE" &&
req.method != "OPTIONS" &&
req.method != "PATCH" &&
req.method != "DELETE") {
return (pipe);
}

unset req.http.cookie;

if (req.method != "GET" && req.method != "HEAD") {
return (pass);
}

if (req.http.Accept-Encoding) {
if (req.url ~ "\.(jpg|png|gif|gz|tgz|bz2|tbz|mp3|ogg)$") {
unset req.http.Accept-Encoding;
} elsif (req.http.Accept-Encoding ~ "gzip") {
set req.http.Accept-Encoding = "gzip";
} elsif (req.http.Accept-Encoding ~ "deflate") {
set req.http.Accept-Encoding = "deflate";
} else {
unset req.http.Accept-Encoding;
}
}

return(hash);
}

sub vcl_hash {
hash_data(req.url);

if (req.http.host) {
hash_data(req.http.host);
} else {
hash_data(server.ip);
}

if (req.http.accept-language) {
hash_data(req.http.accept-language);
}

if (req.http.Cookie) {
hash_data(req.http.Cookie);
}
}

sub vcl_miss {
return(fetch);
}

sub vcl_backend_response {
# Happens after we have read the response headers from the backend.
#
# Here you clean the response headers, removing silly Set-Cookie headers
# and other mistakes your backend does.
unset beresp.http.set-cookie;


### set varnish cache time ttl
if (beresp.ttl < 1d || beresp.http.Set-Cookie) {
set beresp.ttl = 1d;
unset beresp.http.Cache-Control;
return (deliver);
}

set beresp.grace = 1d;

return (deliver);
}

sub vcl_deliver {
# Happens when we have all the pieces we need, and are about to send the
# response to the client.
#
# You can do accounting or modifying the final object here.
unset resp.http.X-Powered-By;
unset resp.http.Server;
unset resp.http.X-Drupal-Cache;
unset resp.http.X-Varnish;
unset resp.http.Via;
unset resp.http.Link;

return (deliver);
}
I was wondering, after a delete some log files, the disk is furthermore full.

Show which process is using a deleted files
lsof +L1show something like that
filebeat 2416 root 608r REG 202,1 36527 0 135333 /var/log/syslog-20170509 (deleted)
filebeat 2416 root 615r REG 202,1 28672 0 135049 /var/log/syslog-20170511 (deleted)
filebeat 2416 root 618r REG 202,1 12288 0 135054 /var/log/syslog-20170512 (deleted)
filebeat 2416 root 621r REG 202,1 262144 0 140842 /var/log/syslog-20170513 (deleted)
filebeat 2416 root 623r REG 202,1 28672 0 134561 /var/log/syslog-20170521 (deleted)
filebeat 2416 root 628r REG 202,1 32768 0 134341 /var/log/syslog-20170515 (deleted)
filebeat 2416 root 634r REG 202,1 8192 0 133773 /var/log/syslog-20170517 (deleted)
filebeat 2416 root 638r REG 202,1 8192 0 136486 /var/log/syslog-20170518 (deleted)
filebeat 2416 root 640r REG 202,1 16384 0 135055 /var/log/syslog-20170519 (deleted)
Restart your process and all is fine
Found here
Install Varnish 5.1 6 on Ubuntu 16.04 sound´s like easy. WTF? Not realy
Here is my configuration of Varnish with Nginx ssl on Ubuntu 16.04/18.04
With my configuration you don´t need adjust varnish port config. Feel free to adjust your Varnish config, increase your memory pool etc.
Update april 2018
*Please install directly Varnish 6 and no older Version *
Update July 2018
Notice for Ubuntu 18.04 it gives no deb package at the moment
you must use the xenial packages, see github comment
https://github.com/varnishcache/pkg-varnish-cache/issues/100
Update October 2018
DEB package for Ubuntu 18.04 are available
First install Varnish 4.1 or 5.1 6
You can use Ubuntu repository
apt-get install varnish
Now you have Varnish 4.1 on the System
Or use these instructions to install Version 6
https://varnish-cache.org/releases/install_debian.html
So you will get Varnish 5.1 6
start and enable Varnish as service
sudo systemctl start varnish.service
sudo systemctl enable varnish.service
Description from Varnish to config Varnish with systemd
https://docs.varnish-software.com/tutorials/configuring-systemd-services/
Look at here when you in trouble with systemd and Varnish or below, its easy to solve.
THX to Mattia for this great blog post or the new solution from varnish below. Varnish solution testet with version 6.
http://deshack.net/how-to-varnish-listen-port-80-systemd/ (Link is no longer valid)
This Snippet is from Mattia´s blog post
The real problemThe official tutorial is a little bit outdated. Or, better, doesn’t take into account the testing version of Debian, which uses systemd instead of init.d as init system. And this makes a huge difference, explained in a bug report. Basically,
/etc/default/varnishis only read by the/etc/init.d/varnishscript, not by the systemd init script (/lib/systemd/system/varnish.service).Now that we know this little detail not reported in the documentation, it’s easy for us to solve the problem.
The easy solution
All we have to do is override the systemd init script of varnish and change something.
# cp /lib/systemd/system/varnish.service /etc/systemd/system/
# nano /etc/systemd/system/varnish.service
We come up with something like this:
[Unit]
Description=Varnish HTTP accelerator

[Service]
Type=forking
LimitNOFILE=131072
LimitMEMLOCK=82000
ExecStartPre=/usr/sbin/varnishd -C -f /etc/varnish/default.vcl
ExecStart=/usr/sbin/varnishd -a :6081 -T localhost:6082 -f /etc/varnish/default.vcl -S /etc/varnish/secret -s malloc,256m
ExecReload=/usr/share/varnish/reload-vcl

[Install]
WantedBy=multi-user.target
Which is similar to what we saw before. We already now that we have to change the port passed as a value to the -a flag:
ExecStart=/usr/sbin/varnishd -a :80 -T localhost:6082 -f /etc/varnish/default.vcl -S /etc/varnish/secret -s malloc,256mWhy don’t just let this script read the
/etc/default/varnishfile? Because we don’t know, for now, what systemd or other init systems are going to do with default files. They could ignore them in the future, for example. Therefore, the safest solution for us is writing the full command in the script itself.Problems: reloading Varnish
After discovering what explained above, we could consider the varnish default file completely unuseful. That’s not right. In any moment we could want to reload the Varnish configuration, this way:
# systemctl reload varnish.serviceAnd here come other problems. That command runs the
/usr/share/varnish/reload-vclscript, which reads the/etc/default/varnishfile. This implies that we have to update both/etc/systemd/system/varnish.serviceand/etc/default/varnishin order to make Varnish work properly.
Customize Varnish default config
https://varnish-cache.org/docs/trunk/tutorial/putting_varnish_on_port_80.html
/etc/systemd/system/varnish.service.d/customexec.conf
cd /etc/systemd/system/
mkdir varnish.service.d
vim customexec.conf[Service] ExecStart= ExecStart=/usr/sbin/varnishd -a :80 -T localhost:6082 -f /etc/varnish/default.vcl -S /etc/varnish/secret -s default,1g
run systemctl daemon-reload and systemctl restart varnish
don´t edit your /etc/default/varnish changes there will not be affected to your varnish config. Edit your systemd conf file /etc/systemd/system/varnish.service.d/customexec.conf
/etc/varnish/default.vcl
adjust the port on the default.vcl or more when you need it. With Varnish 6 is default 8080.
Change it to 8080
#
# This is an example VCL file for Varnish.
#
# It does not do anything by default, delegating control to the
# builtin VCL. The builtin VCL is called when there is no explicit
# return statement.
#
# See the VCL chapters in the Users Guide at https://www.varnish-cache.org/docs/
# and https://www.varnish-cache.org/trac/wiki/VCLExamples for more examples.

# Marker to tell the VCL compiler that this VCL has been adapted to the
# new 4.0 format.
vcl 4.0;

# Default backend definition. Set this to point to your content server.
backend default {
.host = "127.0.0.1";
.port = "8080";
}

sub vcl_recv {
# Happens before we check if we have this in cache already.
#
# Typically you clean up the request here, removing cookies you don't need,
# rewriting the request, etc.
}

sub vcl_backend_response {
# Happens after we have read the response headers from the backend.
#
# Here you clean the response headers, removing silly Set-Cookie headers
# and other mistakes your backend does.
}

sub vcl_deliver {
# Happens when we have all the pieces we need, and are about to send the
# response to the client.
#
# You can do accounting or modifying the final object here.
}
look with properties Varnish is running
ps aux | grep varn
varnish 18342 0.0 5.3 118936 84584 ? SLs 08:53 0:00 /usr/sbin/varnishd -a :6081 -T localhost:6082 -f /etc/varnish/default.vcl -S /etc/varnish/secret -s malloc,256m
vcache 18350 0.0 5.5 339568 87252 ? Sl 08:53 0:01 /usr/sbin/varnishd -a :6081 -T localhost:6082 -f /etc/varnish/default.vcl -S /etc/varnish/secret -s malloc,256m
root 31137 0.0 0.0 11228 876 pts/6 S+ 09:47 0:00 grep –color=auto varn
root 31600 0.1 0.2 181600 3560 pts/4 Sl+ 09:09 0:04 varnishhist
Varnish is running you can test it with
your ip:6081
You will see a screen with a backend error, lets fix us this.
Now we need the nginx web server or apache
apt-get install nginx
We need 3 config files
The first config file are redirect from port 80 to 443 and add www to your domain.
vim /etc/nginx/sites-available/redirect
server {
listen 80;
server_name example.com;
return 301 https://www.example.com$request_uri;
}
We need our main config file that will be run our website. I will serve a static html page for the moment.
vim /etc/nginx/sites-available/roundtrip
server {
listen 8080 default_server;
root /var/www/html;

server_name _;

location / {
# First attempt to serve request as file, then
# as directory, then fall back to displaying a 404.
try_files $uri $uri/ =404;
}

}
The last config file our ssl termination with nginx. I´m using let´s encrypt certs. You can use self signed cert´s or buy something.
vim /etc/nginx/sites-available/ssl
server {
listen 443 http2 ssl;

server_name www.exmaple.com exmaple.com;
ssl_certificate /etc/letsencrypt/live/www.exmaple.com/fullchain.pem;
ssl_certificate_key /etc/letsencrypt/live/www.exmaple.com/privkey.pem;
location / {
proxy_pass http://127.0.0.1:6081;
proxy_set_header X-Real-IP $remote_addr;
proxy_set_header X-Forwarded-For $proxy_add_x_forwarded_for;
proxy_set_header X-Forwarded-Proto https;
proxy_set_header X-Forwarded-Port 443;
proxy_set_header Host $host;
}

}
lets activate our new nginx config
cd /etc/nginx/sites-enabled/

ln -s /etc/nginx/sites-available/redirect redirect
ln -s /etc/nginx/sites-available/roundtrip roundtrip
ln -s /etc/nginx/sites-available/ssl ssl

check the config

nginx -t
nginx: the configuration file /etc/nginx/nginx.conf syntax is ok
nginx: configuration file /etc/nginx/nginx.conf test is successful

service nginx restart
That´s it!
