linux
Step by Step Server 2016 Remote Desktop Services QuickStart Deployment #RDS #VDI #RDP #RemoteApp
Setting up a RDS Farm is not that hard but anyway I created a step by step guide to build a Windows Server 2016 Remote Desktop Services deployment.
there is a new feature in the Windows Server 2016 RDS : Full OpenGL support with RDS for VDI scenarios.
And Yes you can use the Quickstart but I’m not using this in this demo setup. I tried to do a complete setup,but doing this I noticed that I’m constantly expanding this demo with new options so. I’ll keep this pure to the setup and some PowerShell basics.
Quick Start is an option in RDS deployment during the process of adding roles and features with Windows Server 2012 Service Manager. It dramatically simplifies the deployment process and shortens go-to-market while still providing the ability to add additional RDS servers as needed. The abstraction formed by RDWA, RDCB, and RDSH offers such elegancy…
View original post 1,189 more words
Mysql ha alternative
Puppet – Join machine to the Windows AD Domain
How to increase disk size of Trend Micro IWSVA (InterScan Web Security Virtual Appliance)
Best practices for DNS settings on DC and domain members.
Information:
The following information explains the Best practices for DNS client settings on Domain Controller and Domain Member.
Domain controller with DNS installed:
On a domain controller that also acts as a DNS server, recommended that you configure the domain controller’s DNS client settings according to these specifications:
IP configuration on domain controller:
- In single DC/DNS in a domain environment, DC / DNS server points to its private IP address (not to loopback 127.x.x.) as preferred DNS server in TCP/IP property.
- If multiple DCs that’s the DNS servers are in a domain environment, recommendation to have all DCs point to ANOTHER/REMOTE DC’s IP address as preferred DNS and then point to it’s private IP address as an alternate DNS.
- Each DC has just one IP address and one network adapter is enabled (disable unused NICs).
- IPv6 should not be disabled on DC’s NIC card. Set it to “obtain IPV6 address automatically” and “obtain…
View original post 186 more words
Command Line to Display UUID or MAC Address of a Computer
In the event that you’re using UUID or MAC Address to uniquely identify servers in the a database (the MDT database for example) you might want a quick and easy way of getting these values from the Command Prompt on the target server/client…
UUID
MAC Address
or
/ JC
Apache Varnish ssl
You want to use apache with varnish and ssl. Let´s start.
First install Varnish 6
Please Look here for install Varnish on Ubuntu/Debian
https://packagecloud.io/varnishcache/varnish41/install#manual-deb
replace trusty with bionic
root@remote:~# cat /etc/apt/sources.list.d/varnishcache_varnish60.list
deb https://packagecloud.io/varnishcache/varnish60/ubuntu/ bionic main
deb-src https://packagecloud.io/varnishcache/varnish60/ubuntu/ bionic main
Install Varnish 6
apt-get install varnish

start and enable Varnish as service
sudo systemctl start varnish.service
sudo systemctl enable varnish.service

Attention look here for more information about Varnish and Systemd
https://docs.varnish-software.com/tutorials/configuring-systemd-services/
Next Step we configure Varnish
systemctl edit varnish.service
Insert following, feel free do adjust your memory settings
[Service]
ExecStart=
ExecStart=/usr/sbin/varnishd -a :6081 -f /etc/varnish/default.vcl -s malloc,256m -p first_byte_timeout=600

we create a full replacement of varnish.service
systemctl edit --full varnish.serviceMake your changes and save the file. After saving we reloading the systemd config
systemctl daemon-reload
You can also adjust /etc/varnish/default.vcl for Browser caching or anything else
https://konkretor.com/2017/05/29/leverage-browser-caching-with-varnish/
That´s it for install and adjust Varnish
Install Apache with SSL
apt-get install apache2
We create a redirect from http to https
vim /etc/apache2/sites-available/redirect.conf
<Virtualhost vhost.example.com>
ServerName vhost.example.com
DocumentRoot /var/www/html
<IfModule mod_rewrite.c>
RewriteEngine On
RewriteCond %{HTTPS} off
RewriteRule (.*) https://%{HTTP_HOST}%{REQUEST_URI} [R=301,L]
</IfModule>
</Virtualhost>
We create a new vhost file with rondtrip.conf, we running the static site with port 8080
vim /etc/apache2/sites-available/roundtrip.conf
<VirtualHost *:8080>
ServerAdmin webmaster@localhost
DocumentRoot /var/www/html
ErrorLog ${APACHE_LOG_DIR}/error.log
CustomLog ${APACHE_LOG_DIR}/access.log combined
</VirtualHost>
We create a new vhost file for ssl
vim /etc/apache2/sites-available/ssl.conf
<VirtualHost *:443>
DocumentRoot /var/www/
SSLEngine on
SSLCertificateKeyFile /etc/ssl/private/sslcert.key
SSLCertificateFile /etc/ssl/private/sslcert.crt
# SSLCertificateChainFile /eDigiCertCA.crt
</VirtualHost>
we delete the default site, we don´t need it
rm /etc/apache2/sites-enabled/000-default.conf
We are enable the apache config
a2ensite redirect.conf
a2ensite ssl.conf
a2ensite roundtrip.conf
We are enable port 8080
vim /etc/apache2/ports.conf
add
Listen 8080
Enable some modules that we need
a2enmod proxy
a2enmod proxy_http
a2enmod headers
Check your Apache Config
apachectl configtest
Restart your Apache
systemctl restart apache
That´s it!
Xen vhd to vmdk
Converting from a Xen Server to a VMWARE Server isn´t easy. Normal you can use VMWARE Converter it works fine with Windows. Linux loves Clonezilla but only with one disk. My situation is a Linux vm with multiple disk with LVM.
What we need:
- QEMU disk image utility for Windows
https://cloudbase.it/qemu-img-windows/
- enough disk space
- winscp
- putty
Shutdown your vm. Login to your xen machine and figure out which disk you need.
See “How to find the disk associated to a VM from XenServer CLI”
https://support.citrix.com/article/CTX217612
xe vm-disk-list vm=test_lvm
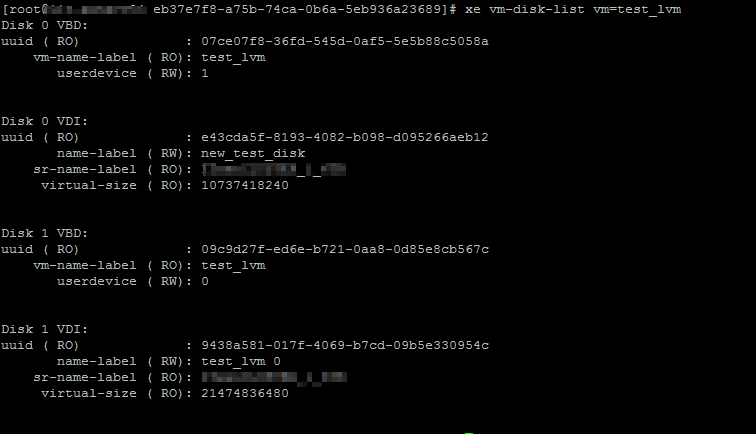
copy the vhd files that you found with vm-disk-list to your migration machine.
I have used the powershell to convert my two vhd disk
.\qemu-img.exe convert -f vpc 9438a581-017f-4069-b7cd-09b5e330954c.vhd -O vmdk test_lvm_sda1.vmdk -p

It takes a few minute. After migration copy your new vmdk file to your vmware storage.
Attach the disk to your vm and choose IDE and not SCSI. Note the sequence from your old xen disk. Should be in the same order
fire it up 🙂


User Account Control: Run all administrators in Admin Approval Mode
This affects how UAR works and can block remote local admin connections.
This can be changed in Local Computer Policy | Computer Configuration | Windows Settings | Security Settings | Local Policies | Security Options
Set it to Disabled, requires a reboot